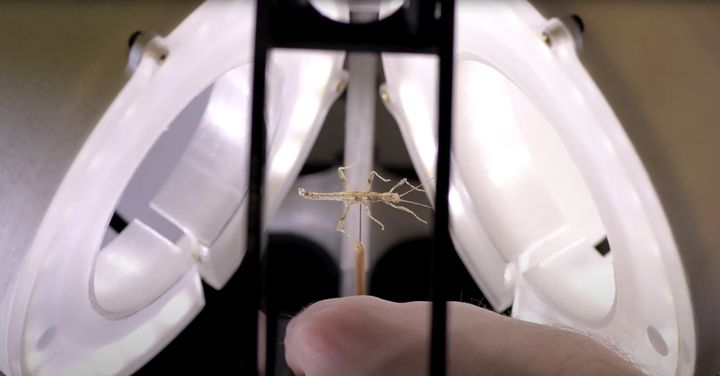
"The Sphere" 3-Axis Panorama Focus Stacking & Photogrammetry
Unlike many of the typical tabletop 3D scanners, "The Sphere" includes a 360 degree photo booth. The subject is surrounded in a spherical capsule that’s brightly illuminated on the inside.

Preparing a scan subject for the scAnt 3D scanner [Source: scAnt / YouTube]
The subjects are mounted on a needle at the center of the sphere, which allows illumination of the bottom as well as the top and sides. This setup should provide an ability to capture images of outstanding quality and resolution, perfect for photogrammetry and 3D focus stacking.
 |
 |
Photography & Project by panoplace.com & Stefan Dungs
A mechanical precision clamping system can also be used for precise positioning of the object. A clamping device holds the needle securely in position.
 |
 |
Photography & Project by panoplace.com & Stefan Dungs
"The Sphere" provides a means for rotating the object on two axes. This provides a way to expose each surface area to the camera hole. Outside the hole will be a suitable camera and stacking system that can rapidly capture images. The LED lighting of the dome is controlled by the controller via an external relay box.
During the use of "The Sphere" systems, a few points were noticed that make optimal use more inconvenient or even more difficult. Due to the experience, some points have been improved which are presented and discussed here.
DSLR or DSLM camera with tube lens system and Mitutoyo lens
In order to ensure a long working distance, the use of lenses with a large working distance like the ones from Mitutoyo is essential.

Photography & Project by panoplace.com & Stefan Dungs
Based on the large magnitication this system is recommended for small objects.

Photography & Project by panoplace.com & Stefan Dungs
DSLR or DSLM camera with a classic magnifying lens
Alternatively, for larger objects, a classic magnifying lens can be used in conjunction with suitable intermediate rings mounted on a DSLR or DSLM camera.

Photography & Project by panoplace.com & Stefan Dungs
The advantage of a DSLM camera solution lies in the fact of the high frame rate and the electronic shutter, which guarantees low-vibration work.
By using a classic magnification lens, the depth of field can be individually adjusted by adjusting the aperture. The intermediate rings, especially when using a variable screw system, the magnification can be adapted to the object.

Photography & Project by panoplace.com & Stefan Dungs
Raspberry Pi with HQ camera
In addition to the classic DSLR or DSLM solution, a Raspberry Pi with a connected HQ camera can also be used to create Photogrammerty photos. The Raspberry Pi HQ camera creates 12M pixel photos.

Photography & Project by panoplace.com & Stefan Dungs
The controller is connected to the GPIO port of the Raspbverry Pi and triggers the recordings. The photos can be saved either locally or on the network for further processing.
The use of a zoom lens helps to set the appropriate magnification or the working distance depending on the object. The automatic exposure correction of the HQ camera helps to find the optimal exposure settings.

Photography & Project by panoplace.com & Stefan Dungs
OptoStacker with OptoTune focus tunable lense
Another alternative to the clasical motor stacking approach an pure optical solution is the use of the OptoStacker system in compination with an focus tunable lense system:

Photography & Project by panoplace.com & Stefan Dungs
With a maximum of 400 images per second the system is extremly fast and without any vibration or movement during the operation. In this case the motor stacking slide is not used during the stacking cycle.
